Welcome to my own little spot of blog space. Thank you for stopping by. I hope you will check back often to see what kind of craftiness I have going on in the world of scrapbooking, card making and general crafting.

Saturday, December 31, 2011

Happy New Year!

Wishing you all 
Joyous and Happy 
New Year!  


Sunday, October 16, 2011

Totally Nuts for You!!

I had fun playing with my new Cricut Imagine.  This is my first real "project".  


I created this for Robyn's October 2011 My Pinkalicious Blog Hop challenge to make a goodie bag or 3-D item that is for a Holiday.  Any Holiday or Occasion will be perfect.   You can find more information at My Pink Stamper.  (I love her website and videos - they are so inspiring!)  

I cheated a little...and made this for my husband for "Sweetest Day" which was October 15. (I'm a day late...) Typically this little known "holiday" is reserved for confections and candy -- but you can find out more about this "holiday" here.

Recipe:
  • Punch top of bag with border punch
  • Tag Base - Cricut Imagine pre-loaded image filled with pattern from Heirloom cartridge and cut at 4"
  • Squirrel and acorn - filled with various Heirloom patterns, cut at 3" and inked around the edges with Chestnut ColorBox Chalk.  The eyes and nose are filled in with black Glaze pen.  The mouth is filled in with red Glaze pen.
  • Pop dot squirrel and acorn to tag base. 
  • Stamp image (sorry, it's not one of Robyn's stamp sets - I don't have any of hers....YET!  Hopefully that will change soon, she has sooo many cute ones.)
  • Fill with goodies and enjoy!!
Thanks for stopping by, if you like what you see or have any suggestions please leave me a comment and/or follow me. 

Happy Scrapping!

Friday, October 14, 2011

Winner, Winner! (Better late than never!)


And the winner is.........


Casey!!!  
Casey said....
I love that you made the tag to match the card! Also, the glaze pens add so much! Very cute card!

Sorry I was late posting the winner.  I packed up almost everything in my scrap area, took out an old very used and breaking down desk and replaced it with tables.  I am loving it!  


Casey, which card set would you like?


Saturday, October 1, 2011

Happy World Card Making Day 2011!!!


Welcome to my blog and thanks for stopping by to celebrate World Card Making Day 2011.  As I am new to card making, I was surprised that there was a full day to celebrate the art of making cards!! 

If you are just stopping by while on the World Card Making Day Blog Tour, WELCOME! Please take a moment to look around -- don't worry it's not very long, just 16 posts since I started a couple of months ago! 

On with my card.......I made this card for my Grandma Sophie's 89th birthday!  She is very dear to our hearts. 

"So Dear" Card
Cricut Cartridges
Card base and Deer - Cindy Loo
So Dear Phrase - Create-A-Critter
Cuttlebug embossing folder
Stickles, Black Glaze pen, Red Glaze pen,
White Signo uni*ball pen, Martha Steward ink pad
Recollections Signature Lumiere Cardstock Paper
DCWV The Glitter Stack 

Cricut Cartridge
                                                               Envelope - Cindy Loo

I used the black and red Glaze and white Signo uni*ball pens
to embellish the deer.  

 With matching gift tag.

Here are some photos from her birthday celebration!
Sophie and Lou with the "68" cake.

 Daulton, Sophie and Dale

 Sophie's Heavenly Birthday Cake

Sophie and I
I'm so happy that she loved her card!

To celebrate World Card Making Day, I’ve decided to do my first give away from my stash of goodies!  Winner will receive your choice of one of the following sets of cards to send as they are or embellish!  

Here’s what you need to do to enter to win:

1) Leave a comment on this post, with a way to reach you. 

2) Subscribe or follow the blog and leave a comment saying that you are now a follower.

A winner will be selected by Random.org on Friday, October 7.

Thanks for stopping by - I hope you will visit again!

Thursday, September 29, 2011

Tuesday, September 27, 2011

I wanted to share another name book with you.  This Spiderman inspired name book was fun to make. Although it was a little challenging to add the little boy's favorite color, GREEN.  


 Cartridges: George and Basic Shapes
Mickey Font (I LOVE this chunky, slanted font!)

The letter "J" was outlined using Crystal Stickles. Crystal is one of
my most used colors.
The metal tags on the side are re-purposed key tags from the 
office supply store.   The color matched perfectly. 

 To add dimension to the square journaling block (or picture mat)
it was raised using pop-dots.  The letter "O" was outlined using Yellow Stickles.

 The red frame was created by using the Spots and Dots 
Cuttlebug embossing folder. The letter "H" was outlined using 
 Green Stickles.

 I don't mind working with these spiders! 
The letter "N" was outlined using Xmas Red Stickles.

Have an amazing Spider*riffic Day!


Thanks for stopping by.....

Friday, September 23, 2011

Cricut Cartridge Organization

Well, I don't know about you but I have started making my Christmas list!  One thing that has to be on it is a new organization system for my Cricut cartridges, books and overlays.  I am almost out of room! Trust me - that is NOT a complaint.  I like the ease of my current solution.  I store the cartridges alphabetically here.....


And I store my books and overlays alphabetically in another container.  Since I use my Design Studio so much, this system works very well for me.


I'll be adding some of my Christmas Wish List items later.  Until then, leave a comment listing your top wish list items for this year. 


Thanks for stopping by.....

Wednesday, September 21, 2011

Personalized Christmas Album

I can not believe that it is almost October!  It seems that this year has gone by very quickly. 

Here's a little glimpse of what you can do with a pre-made album (this one was purchased at Hallmark), a Cricut and a little vinyl.  The recipient (in this case -- his parents) are sure to love this one of kind gift.  

Cricut Cartridge: Alphalicious 

Thanks for stopping by!

Thursday, September 15, 2011

Personalized Name Baby Book -

There is nothing sweeter than a baby's smile and laughter!  

To celebrate Zephyr's birth, I created a name book for his grandmother using my Cricut and Design Studio. Have I mentioned how much I love my Cricut?!?!?  I love making these books as gifts.   I can guarantee this is one-of-a-kind!! 

Zephyr's Full Book


Eucalyptus Stickles was used to accent the patterned paper. 
The embossed "Baby" was cut from a Hallmark Card.


 Crystal Stickles was used to accent the letter E.


 The "P" was embossed using the Cuttlebug Swiss Dots embossing folder 
and Crystal Stickles were used to accent the dots.


 The duck was created using the New Arrival cartridge 
and accented with Yellow and Orange Peel Stickles.


  The "H" and frame were accented with Turquoise Stickles.


 Paw and his two boys!


The "Y" was embossed using the Cuttlebug Traffic Jam embossing folder 
and Crystal Stickles were used to accent the outline.  
The giraffe is SEI Sparklers.


The journal tag is from the Making Memories Animal Crackers spiral journaling book.


The "R" was embossed using the Cuttlebug Swiss Dots embossing folder 
and Eucalyptus Stickles were used to accent the dots and frames.  
The rocking horse ribbon is from Michael's.


  The stick pin is SEI.  


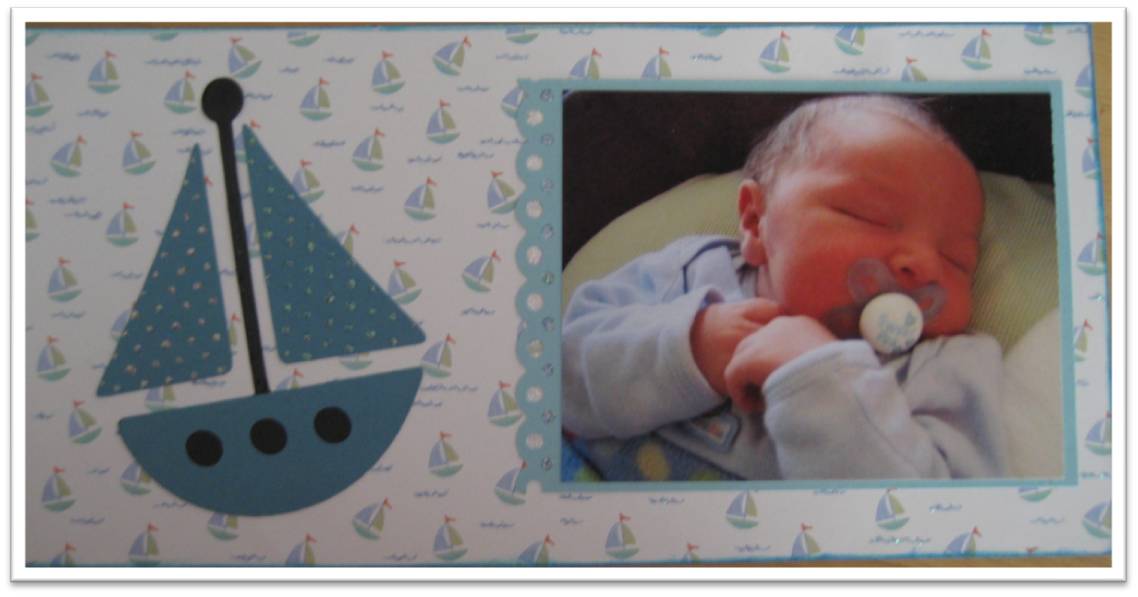
  The boat was created using the New Arrival cartridge, embossed with the Cuttlebug Swiss Dots embossing folder and accented with Crystal Stickles.
 The waves were also accented with Waterfall Stickles.
The photo mat was created by the Martha Stewart Edger - Scallop Dot. 


All about the little details. These are the charms that hang from the book rings. Pastel color eyelets were also used to reinforce the holes for the book rings. 

Name books are a labor of love, but well worth it!  

Thanks for stopping by! 

Friday, September 9, 2011

A birthday gift...

Our niece recently had a birthday.  We always ask her what she wants for her birthday because as a typical teenager -- what she wants changes as much as her miss-matched socks!!!! (LOVE YOU sweetheart!!)

This year she asked for fingernail polish and paints (did YOU know there was a difference?????), a photo album and of course gas money!  I had to pry a little bit about the photo album..does she want just an album to put photos in or does she want a scrapbook...YES there IS a difference!  She texted (is that a word) back that it was for her "Senior Year" so whatever I thought...well, I thought of this.......


A personalized scrapbook album ready for her to fill with her  journaling, photos and memorabilia from her senior year.  It's a 12 x 12 black album with white vinyl lettering and a green rhinestone (her school colors are green, gold and white).  Daulton picked out some 12 x 12 zebra paper in different colors and some ribbon to start off her collection. 

Thanks for stopping by!  Up next....a personalized name book.  Stay tuned.

Wednesday, September 7, 2011

A little sadness...

I am often caught without the words to express how I feel.   But I hope that through my crafting others know how much they mean to me and how much I care about them.  

As an example, after hearing the news that our dear friends mother passed away, my husband was able to travel right away to be with them.  I stayed for work and for our son to finish the school week.  We followed as soon as school was out on Friday but in the meantime -- at night -- I grieved in my craft room.  I tried multiple times to make a card, nothing seemed right....then  I remembered how much she enjoyed a framed scrapbook page that I made featuring her and her kids and came up with this...


I was honored when the family included this on the memorial table celebrating her life.  


To create this I used a frame that I got at Hobby Lobby (50% off), some Pearl Coredinations Gemstones card stock (my new favorite card stock!!), the Silhouette using a true type font, some black vinyl, a Basic Grey "bling it" rhinestone sticker, ribbon, some flowers and ColorBox Charchol ink.


Please remember to tell the ones you love, that you love them - and tell them often!!


Thanks for stopping by, next up....a "Class of 2012" personalized scrapbook album cover.

Friday, August 19, 2011

Cricut Die Cut and "Toss" Swap Item Organization

I enjoy participating in Club CK's Monthly "Toss" Swaps.  Each month our hostess picks a theme and you "Toss" scrapbook related goodies matching that theme to other players.   It is always neat to see how others interpret the theme.  I was keeping all of my tosses together in a page protector like this.... 

It served it's purpose of keeping all of the "like" things together but my problem was the old saying "Out of Sight. Out of Mind." and I wasn't using my goodies -- so I had to come up with another way to store them.  I decided to re-purpose my son's old Pokeman card album and card holders to display my die cuts, journaling blocks and stickers.  

I continued to use page protectors for the larger items. 
I hope this will help me use up my stash of awesome scrapbooking goodies. 

Hope you have a great day!


Monday, August 15, 2011

Coffee Filter Card

Here's a card I created for the Club CK Summer Camp 2011 - Use Coffee Filters on a Project or Layout challenge.   


I used Natural Brew Coffee Filters. 


Cut a strip from the top of the filter, misted with water and crinkled it.  After I straighten it out I used the heat gun to dry it. 

 After it was dried I used Tim Holtz Walnut Stain Distress Ink.


Other items used were: 
Wausau Paper (scrap pack)
Natural  color card stock
Cricut Cartridge - Graphically Speaking (cut at 2 1/2")
Favorite Findings - Blue and Brown Buttons
Offray brown ribbon
Raffia


Hope you have a delicious day, thanks for stopping by!


Saturday, August 13, 2011

Creating a Mini-Album

I am in the process of creating a 4th of July mini-album for the Club CK Summer Camp 2011 Challenge.  

Here's the cover page.


Yep, you are reading the ribbon correctly....the pictures are from 2008.   The challenge (to create a mini-album) was perfect timing.  I was motivated by the challenge to work on this but was inspired by Lisa.  She was working on her 4th of July mini album last week. 

Here's a few inside pages...

I was able to use a lot of stuff from my stash and recent "tosses" and swaps.  

Thanks for stopping by. 

Thursday, August 4, 2011

Tuesday, August 2, 2011

Blast Off! - The Adventure Continues....THIS IS AWESOME!

I am having so much fun making this project!
Here's the front cover - 


Blast Off! for an Adventure

I'm usually not a big kit person, but I have been eyeing the Bo Bunny Blast Off! Project Kit, so I broke down and bought it!  


Here's the before picture - stay tuned for the finished project.